Wednesday, February 27, 2013

too many projects

I guess I should start to hire some woodchucks for my little woodshop. Since I'm starting to get a little much on my hands to handle and my garage looks like a lumberyard.

First of all I'm now 13 days late to deliver a part of my valentines gift to my darling of wife. Since I can't figure out how to finish this project.

Basically I promised her a little guinea pig cage, so that Mojito can 'roam' the 'great outdoors', meaning our backyard and be save from Hawks and puppies.

The initial part of building the frame was rather simple and straight forward and I literally used every power tool in my shop for this. Which is exciting, that they are all playing together.

pairing the lab joints, with one of my christmas gifts

they are getting more and more precise

turning the tenons on the lathe, as an exercise to repair our chair-legs.

all parts are cut and ready to be glued up


frame is ready, now how to stop the guinea pig from escaping?


But I'm stuck at the point of adding some form of wire mesh, to make it look nice and safe. This has been the stand of the last 13 days and there is no end in sight. Which makes me feel rather bad.

The second project was to re-saw a part of a tree, for my friend martin and flatten the surface (so that he can polish it) This was done in about 6 hours and not to bad, and promptly maxed out the capacity of my bandsaw.

martins mystery wood, which smells strangely like cat urine...

building a small sled to keep all my fingers save and sound

cutting the first slice on the bandsaw. This piece of wood is about 14"/35cm heigh.

all cut into 1 1/2" slices and ready to be flattened

Last but not least, after 2 years of research and planning I decided to buy the first parts of the stereo system, I really want to have. Meaning speakers and amplifiers, but these need an audio rack. Apparently at a depth of 20", my amplifiers are now to deep and to heavy for normal audio furniture. Which means I need to build my own (or buy one for thousands of $$$, which I refuse).

So now I'm designing my first piece of furniture and hope it will work out ok, which will be a long process and let's me work with some new wood, called poplar. Which is rather cheap and affordable.
working with purple hearts for accents. The 'drill' is btw a mortiser, which drills square holes

first 30 mortises and 30 tenons cut and paired. Again using one of my beloved chisels

a first try at the legs, using a lock miter joint to simulate 3x2" wood. Since it's impossible to find in this size

glueing up the first leg

using a small block pane to cleanup the joints. Not to happy with the legs at this point in time and I really need some more lie-nielsen planes.

So at this point I invested about 200$ in poplar and generated quite a bit of saw-dust, but have no real results. Besides 5 legs, of which one is not really up to my standards and one cracked under clamp pressure. Which makes me rather nervous about trusting them with my amplifiers.

Saturday, February 02, 2013

progress with the mini lathe

Now that I finally learned how to sharpen my lathe tool and after picking up any thicker wood (2-3") I can find for the last couple of months.
I managed to turn my first 'muddler' for mojitos.

Which is made from some ash and took about 3 hours of turning and sanding up to 600 grit. Still need to practice a lot more, since it still has some tool marks.

first real attempt at turning something

basil is keeping watch, that nobody touches my mojito
Next job, turning a new chair leg for our broken chair, once I find a 2-3x thick piece of oak somewhere and learn how to follow pattern.

I'm also making progress with turning baby rattles, now I just have to get the size right...
'little' baby rattle for my co-workers newborn. About 13 cm long, turned out of a single piece of ash.


Friday, February 01, 2013

Christmas (long overdo)

so after a couple of busy weeks, I finally had time to give my beautiful wife her well deserved christmas gift (well next to the other stuff she got actually on christmas)

 For some reason making her coasters took a lot longer than expected. Since bloodwood is amazingly hard and ruined a couple of my saw blades in the process.

sadly the picture does not do justice how beautiful they are

Another delay was caused, since I wanted to utilize the beautiful face-grain and cut not batch it, as you can with end-grain.

Also I finally managed to finish the development of our christmas pictures. Which shall be used for next years christmas cards.

finally nearly perfect 
smiling is optional in this family. But at least all have the same expression

Basil is ain't that happy with the stupid santa head.

Tuesday, January 01, 2013

Jet 16-32

so about a month ago, I got a really nice delivery for my little cutting board business. A 16/32 Inch drum-sander, which is making live so much easier regarding sanding boards to final thickness and getting them perfectly flat.

it works for cutting boards 
for really thin little coasters
Needless to say it generates a lot of dust and was one of the reasons that I had yet again to rearrange the whole garage and run 4" dust collection hoses to our little dust collector.

Monday, December 17, 2012

SawStop

recently my wife and I talked a bit more about me and my woodworking hobby, since our garage is now more or less a complete wood-workshop (Still missing a jointer, but no space). One of her main concerns is my safety, especially after I got a bloody nose from a flying piece of Wood, due to some form of kickback. Apparently it's a bad idea to cut a round piece of wood on a band-saw and I learned yet another lesson. Wear a face-shield, not only when you work on the lathe.

Now the scary thing was, that if the same thing would have happened on the Table Saw, instead of the flying piece of wood, I possible would look at serious surgery and a bill of 40-50k$ to reattach missing fingers. Needless to say, we are selling the tablesaw right now and replacing it with a SawStop model, to reduce this risk. Since frankly there is no reason not to do it.

Now you might wounder what a SawStop is and how it's different?


It basically has a monitoring system, triggers a brake, if it discovers a finger touching the sawblade. Which is mostly useful during a kickback event, when you hand get's drawn into the blade rather suddenly.

Only question left is, which particular model to get. I'm kinda considering the 52" Fence model or the 36" Fence model, since this is about as big as I can go in my garage. While still being able to park a car.


Monday, December 03, 2012

puppy house - glue up

we are nearing the final stages of the puppy house and started to glue everything up.

running out of space...
And apparently I have to reorganize the garage yet again to make more space and have space to walk around. I do have more or less given up to ever park a car in here...

Wednesday, November 28, 2012

puppy house - roofing blanks are finished

so the next step was to cut all the roofing blanks and glue them into the rabbets of the rafters. For economical reasons we chose cedar fence boards. Since they resist insects and rain quite well, while being rather cheap at 2$ a board.

glue is drying...
Now ones the glue dried we will sand down all the rafters, remove glue squeeze out and fill in the voids to make it look a bit nicer.

Also as you can see I acquired some 48" cabinet clamps, which are just amazing and I want more of them. But so ridiculous expensive.

Monday, November 26, 2012

puppy house is starting to get a roof

now that the Thanksgiving stress is over, I have a little time to focus on the puppy house again. Meaning working on the rafters and finishing the skeleton for the roof.

current roof so far
Nothing fancy joint wise, just the attaching the rafters to each other by a couple of bars and reinforced them with some dowels.

But yes we are getting done with the doghouse.

Saturday, November 17, 2012

making of two cutting boards

now since I acquired some more maple and cherry, it was time to make more cutting boards to sell them  and actually make some money with this idea.

So here is the making off.

After sawing down a board of maple and a board of cherry to 18" long and 1" thick stripes, we assembled our desired patterns and glued them all up.

still don't have enough clamps...

after planning the blanks to thickness and remove the glue squeeze out

preparing the route the edges

routed edges for our one board

preparing to finish it with mineral oil

drying in the air and soaking up the oil

Now let's see how long it takes for them to sell.

But after making these and removing all the tear-out from the planer I was just praying for a 16"+ drum sander. A 10" drum sander is cheap, but absolutely useless for any board bigger than 9".

Wednesday, November 14, 2012

siding - we are making progress at last

now we are finally at the point were we can put the siding on the doghouse and I'm proud to say there are still 0 screws or nails used so far and it is rather sturdy and gets more and more stable with every piece I add.

I'm also started to realize that it's not the power tools, which are expensive and needed. The most expensive part so far are accessories and wood. Like it's just ridiculous how expensive clamps, chisels or saw blades are.

Anyway since I can't use nails to attach the siding, the only choice I have were to use dados. Which are frankly one of the easiest joints to make (if you got a dado blade or a router)

basic concept of a dado joint

Since this project is getting more and more expensive and I'm way over budget by now, I ended up buying cheap cedar fence boards and cutting them to size and plane them to 1/2 thickness (since my largest router bit is 1/2"). And during this process I learned that cedar wrecks absolute havoc with my planers dust collection. Basically the 2" hose I use to connect the planer to my shop-vac keeps getting clogged all the time and forced me to disassemble the planer 3 times to clear out all the stuck shavings since there is not enough suction. I start to see the point of commercial dust collection systems with 4" hoses.

After planning all the cedar, cutting it to size and routing the dados in the struts we ended up with something like this
first parts of the siding are fitted
 Now since the cedar was considered green, it promptly shrunk by about 1/2" over night and left me sitting with something like this...

after a night of drying some of the walls shrunk...
Which means we need to cut some form of outside molding to make it look pretty and make it windproof. Maybe some rafter for the rain run off...

Monday, November 12, 2012

rafter - cutting the bird mouth joints

Since the lap joint's were done yesterday, it was time to cut the bird mouth joints today. As preparation of assembling the roof tomorrow

First how does a bird mouth joint look?

standard birth mouth joint
The next step was to calculate the approximate position and our old friend Pythagorus came to the rescue, since our roof is going to have 90 angle at the top.

a*a + b*b = c*c
And since our dog house is 42" wide, the approximate position of the joints should be around 30". I'm saying approximate since we also have to include the width of the saw blade (slowly learning....) and that our fence is not that precise.

cutting the miters on the table saw
 The first step was to cut the miter on the table saw, while utilizing a block of wood with a clamp as a stop to ensure that all the joints are cut at the same position.

a bit wide
 Now the first cut was just a bit wide and since we did this in batches it meant that all rafters were a touch to wide. Not a big problem, since the joint needs to be on a double top plate anyway and so we just going to cut the top plate a touch wider.

finished joints
And there are our finished ratfters, with two bird mouth joints each, a lab joint and cut to size. Still not sure what todo with the ending, if I leave them at they are round them over. And how to put the wooden planks on. Maybe cutting some rabbits or so.


Sunday, November 11, 2012

starting working on the rafters for the doghouse

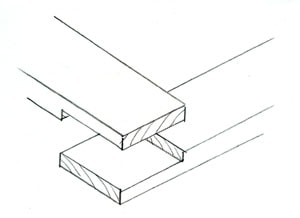
The next step on the doghouse is cutting the lap joints for the rafters.

example lap-joint
Since these joints are located at the end of the boards, we don't have to use a noisy and dusty router for this, instead we can just use the table saw. Which means we will also be done with this a lot faster.

Well in theorie anyway. Since I do not own a 6" Dado blade at this point in time and none of my local stores carries them (they only have 8" dado's and my saw is not powerful enough). Well I'm just sorry out of luck and have to use a little jig and cut them in several steps and ensure that the cut's line up.

out little jig

keeping the fingers save, thanks to all the clamps and the wooden support
apparently I can't raise the saw blade high enough
Now I still encountered a little annoying issue. Basically my rafters are 4" wide and so I need to cut the joint 4" deep, but can only raise the blade 3.75" height... So we had to use the little gent's saw to finish the cut by hand.

And all the 8 joints are finished now, so that we can continue with the dog hosue tomorrow and cut the bird-mouth joints (once I figured out how to calculate the correct positions)

Saturday, November 10, 2012

7 days till our house warming party - 7 days to refinish our oak kitchen table.

Our little house warming party will be in 7 days and one of my projects on the Honey-Do-List is to refinish our kittchen table, which we inherited from the previous owner of this house.

So step 1 is to sand it down...

some of the finish removed, still lot's togo
The next big step is to figure out what kind of finish was on it to begin with and stain it so it matches all the other parts of the table.

Right now I bought 'golden oak', which seems to be the wrong stain...


Finishing the dog house roof supports

after we cut the tenons and mortises last week, it was now time to put all these pieces together using cross lab joints.

Like these, except that there is a mortise in the middle. We need some overlap in these joints, to avoid the wood splitting while the glue is drying.

Now there are several methods of doing these joints. You can use a saw, chisel and bull nose plane, but since I was short this kind of plane I needed another method. So instead we used a small trimm router and a 1/2 mortise bit. Kinda the wrong bit for the job, but I had this laying around so...

one of our mortises from the last week

the lower part of the cut lap joint

all the assembled joints.
 Next step is cutting the rabbits for the siding and start working on the rafters.

Tuesday, November 06, 2012

can't sleep...

so for some reason I'm so busy with work and all my little projects recently that I can't really sleep and wind down or relax.

So I started a late night/midnight project called building a workbench top with only the use of classic hand tools  Which I collected over the years.

Also I'm using mostly scrap wood that is highly bowed, warped and twisted. Just to make it more of a challenge...

jointing the 2x2x96" studs 
gluing the studs and leaving some space for 'dog holes' 
planning the top to get it somewhat level
So the basic idea is to get some support in the future for cutting mortises, tenons and other stuff. Still need to somehow figure out how to build a vise.

Cutting mortise and tenon joints

recently the work on the doghouse slowed down a bit, since for the love of it I could not figure out how to create the roofing support.

Now after reading a couple of more books about this topic I came to the conclusion that I will need a couple of joints for this.

  • a couple mortise/tenon joint
  • a couple half lap joints
  • a bunch of birdmouth joints
So the first step is right now to create the mortises for our tenons and settled on using a drill press as the best possible method, with some help from my chisels to square them up.


after measuring the proportions we remove the waste

square it up with a chisel

fit it slightly loose to leave a bit of space for the glue later


Now I only have to make 15 more and than start working on the lap joints to make the corners fit.

Wednesday, October 24, 2012

my little woodshop

during the process of building our doghouse, I acquired more or less a complete little wood working shop in our garage and notice that it's really really handy to have all these tools available. For example, a couple of days ago our couch broke:

broken plywood support
and it was really easy to fix using a slab of Mahogany I had laying around (which was supposed to be transformed into something entirely different...)
fixed frame, after removing millions of staples
Granted it took me several hours, most of them removing staples from the couch. But it was so nice to have a thickness planer to just dimension the wood down to the thickness you need to make it fit

Also surprisingly it's not really the tools which are the expensive parts, it's all the tiny accessories you need with the tools. Be it a saw-blade or just a square/precision ruler/etc.

Next project is to install two additional 15A circuits into the garage and hopefully a system to collect air bone dust for health regions.

Also slowly making progress with the doghouse, everything is still level and working the roofing joint's next.